Showing posts with label Spring. Show all posts

Monday, February 28, 2022

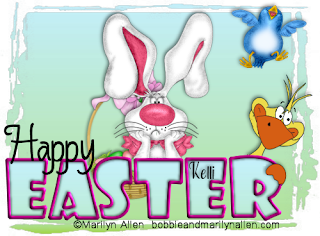
Happy Easter


 This tutorial was written on 2-28-22, By Kelli.

Please don't copy it or claim it as your own or post it through any group.
You may link back to my blog.
Any resemblance to any other tutorial is strictly coincidental.
It is written assuming you have a basic knowledge of PSP and its tools.
It is written using PSP 9 but should work in any other version.
For this tag you will need:
A fat font of choice,
I am using ShowCard Gothic.
And you will need another font of choice for the name.

You will also need this gradient made by Kathyfrances.
You can find it at the Escape from Reality Blog 
the gradient is Here

You will need several tubes by Marilyn Allen.
You can find them Here
Please remember to use appropriate
copy wright; and follow her TOU.
Thanks!

Ready?

Open a new image 600x600 With a transparent background.
Grab your text tool and choose your font.
I am using Showcard Gothic  size 90. Stroke 5; Color of choice, b/g null.
Type EASTER
Then go objects and align in center of canvas. Then convert to raster.
Use your magic wand to select inside of each of your letters.
Expand the selection X1. add a new raster layer and drag it to the bottom.
Go to effects, 3-D effects and cutout.
Here are my settings

Add a new layer and repeat the cutout, changing
the settings for H and V to 2.
Merge down. add a new layer and expand the selection again X1.
Grab your flood fill tool and on your materials pallette go
pattern. Find the gradient in the drop down menu. 
Fill the letters with the pattern. select none. 
Add an inner bevel to the word outline.
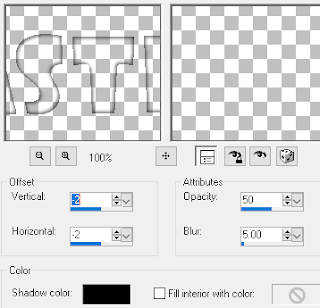

Merge all the text layers and then add a drop shadow.

Paste the duck above the text layer.
Add the same drop shadow.
With your selection tool ,select 
Just the hand of the duck.
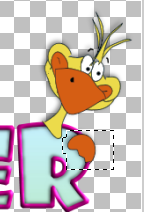
And then invert the selection. Now
promote the selection to layer.
Activate the tube layer again and hit delete,
on your keyboard.
Now drag the promoted selection below the text layer.
Add the other tubes now. Resizing as desired.
Add the same drop shadow to each.
Don't forget the copywright.



Choose another font and type Happy.
Add your favorite text effects.
Crop excess canvas,
Choose another font and type your name.
Use your favorite text effects again.
Open the gradient again,
Add a new layer to your tag and drag it to the bottom.
Select all and paste the gradient into selection.
Select none and load a mask of choice.
I am using this one
Merge group. 
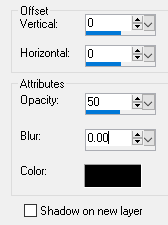
Add this drop shadow


Save as a PNG.
Thanks for trying my tutorial! 
I would love to see your results!


Friday, February 18, 2022

In like a Lion


This tutorial was written on 2-18-22, By Kelli.
Please don't copy it or claim it as your own or post it through any group.
You may link back to my blog.
Any resemblance to any other tutorial is strictly coincidental.
It is written assuming you have a basic knowledge of PSP and its tools.
It is written using PSP 9 but should work in any other version.
For this tag you will need:
A fat font of choice,
I am using Kiss melody.
And you will need another font of choice for the name.

You will also need this mask and gradient made by Kathyfrances.
You can find them at the Escape from Reality Blog 
I used Mask # 43 Here
And this gradient Here

You will need a Lion tube,
I am using one from 
Colourbelle
Find here at CDO
And you will need a Lamb tube.
I couldn't find one So I am using this one from this scrap kit:
Touch of spring
by LaReina Designz
This is a beautiful kit!
It was perfect for what I needed for this tag!
Please go check out her kits!


Ready?

Open a new image 600x600 With a transparent background.
Grab your text tool and choose your font.
Color doesn't matter Because we are going to cover it with the gradient.
 Set the size of the font kind of big, and play with the Kerning settings.
Type MARCH
Then go objects and align in center of canvas. Then convert to raster.
Select all, float and then de-float the selection.
Add a layer and paste the gradient into selection. Select none, and then
Merge down. Now add this drop shadow twice.


Now add this inner bevel


I did the shadow again this time changing the H & V to -2 and 2.
Ok now move the word over and down a bit.
Position the lion behind the word;
and put the lamb on top of the word art.
Be sure to add appropriate copy wright.
Open your mask in PSP and minimize it.
Activate the bottom layer and select all, then paste a paper of choice into selection.
Select none, then go Layers, New mask layer, from image
Then find your image and add with these settings


Then merge group.
Now add some more elements from your kit.
Remember to add a the same drop shadow to each of the elements.
Add your name and your favorite text effects.
I only did the same drop shadow.
Position everything as you like it.
Now use a few other fonts to make your word art,
Type In like a Lion
Out like a Lamb
.
Add your favorite text effects and position to your liking
Save as a PNG.
Thanks for trying my tutorial! 
I would love to see your results!